Introduction to Changing a Breaker
Changing a breaker might sound intimidating, but it doesn’t have to be. If you’ve ever experienced flickering lights or devices that suddenly lose power, chances are you need to swap out an old or malfunctioning breaker. Understanding how to change a breaker safely is essential for every homeowner and DIY enthusiast. Not only can it save you money on electrician fees, but it also empowers you to take control of your home’s electrical system.
In this step-by-step guide, we’ll walk through the entire process—from turning off the power and identifying the correct breaker to installing a new one with confidence. You’ll discover essential toolschange a breaker you’ll need along the way and safety precautions that ensure you’re working wisely—with no room for error. Whether you’re tackling this project yourself or just curious about what goes into changing a breaker, let’s dive in!
Why it is Important to Change Breakers Safely
Changing breakers safely is crucial for both your safety and the functionality of your electrical system. A malfunctioning breaker can lead to serious hazards, including electrical fires or equipment damage. Knowing how to change a breaker with care minimizes these risks significantly.
When breakers trip frequently, it’s often an indication of underlying issues that could escalate if left unaddressed. By replacing a faulty breaker promptly and correctly, you ensure that your home remains safe and powered efficiently.
Moreover, working on electrical panels without proper precautions can expose you to shock or injury. Understanding the right procedures protects not only yourself but also others around you. Safe practices foster peace of mind while handling essential household systems.
Taking time to follow safety protocols translates into long-term benefits for your home’s wiring integrity and enhances overall energy efficiency as well.
Necessary Tools and Materials
To change a breaker successfully, you’ll need a few essential tools. Start with a flathead screwdriver and a Phillips screwdriver. These will help you access the panel and remove screws.
Next, grab some insulated gloves. Safety should always be your top priority when working with electricity. Gloves provide an extra layer of protection against accidental shocks.
A voltage tester is another crucial tool. It ensures that the power is off before you begin working on any electrical components. This small device can save you from dangerous surprises.
Additionally, keep a pair of pliers handy for gripping wires or bending them as needed. They come in useful when dealing with tight spaces within the breaker panel.
Having replacement breakers on hand makes your task much smoother, so ensure you choose the right type for your system before starting this project.
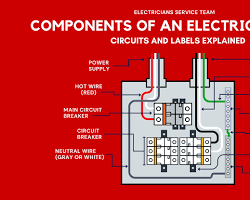
Step 1: Turn off Power and Identify the Correct Breaker
Before diving into the task, your first step is crucial: turning off the power. Locate your main electrical panel and flip the main breaker to ensure safety. This action cuts off electricity to the entire house, making it safer while you work.
Next comes identifying the correct breaker to change. Use a flashlight if needed and inspect each switch in your panel carefully. If you’re unsure which breaker powers a specific room or appliance, you can test them one by one.
Consider labeling each breaker as you go for future reference, especially if this is your first time working on electrical systems. Clarity now will save confusion later when troubleshooting any issues down the line. Always remember; taking these simple precautions not only ensures your safety but also makes subsequent steps easier.
Step 2: Remove the Old Breaker
With the power off, it’s time to focus on removing the old breaker. Start by carefully loosening any screws that hold it in place. You’ll typically find these securing the breaker to the panel.
Once you’ve loosened them, gently pull the breaker away from its slot. Be cautious; there may be wires connected to it that need careful handling.
Take a moment to inspect those wires. If they seem worn or frayed, now might be a good time to replace them too.
As you disconnect each wire from the terminal screws, make note of their positions for future reference when you install your new breaker.
Keep all removed parts together and organized so everything remains easy to manage during installation!
Step 3: Install the New Breaker
Now that you’ve removed the old breaker, it’s time to focus on installing the new one. Start by carefully aligning the new breaker with its slot in the panel. Make sure it fits securely.
Next, push the breaker down into position until you hear a click. This sound indicates that it’s locked in place and ready for action.
After securing it, connect any necessary wires back to their terminals. Ensure each wire is fastened tightly without being overly crimped or damaged.
Double-check your connections before moving forward; loose wires can lead to serious issues later on.
With everything securely attached, take a moment to look over your work. You want this installation done right!
Step 4: Test the New Breaker and Restore Power
After installing your new breaker, it’s time to test its functionality. Before you do anything else, ensure that all switches and outlets on the circuit are off. This will help prevent any sudden power surges when you restore electricity.
Next, return to the main panel and flip the new breaker back to the “on” position. You should hear a satisfying click as it engages.
Once powered on, proceed cautiously to check each outlet or appliance connected to that circuit. Use a voltage tester if needed, ensuring everything is functioning correctly without any flickering lights or odd smells.
If everything checks out fine and operates smoothly, you’ve successfully changed your breaker! If not, switch off the breaker again and double-check your connections for any loose wires or improper installation before attempting another test.
Safety Precautions and Tips
When working with electrical systems, safety should always come first. Before you begin changing a breaker, ensure you’re wearing insulated gloves and safety goggles. These simple precautions can protect against accidental shocks.
Keep your workspace tidy. Remove any clutter that could cause trips or falls while you’re focused on the task at hand. Clear access to your circuit panel is essential for efficient and safe work.
Always double-check that the power is indeed off before touching any wires or breakers. A voltage tester can be a reliable tool to verify this step.
Have someone nearby who knows what you’re doing, in case of an emergency. It’s wise to have help if something doesn’t go as planned.
Never rush through the process. Taking your time reduces chances for error and enhances overall safety during the installation of your new breaker.
Common Mistakes to Avoid
When changing a breaker, several common mistakes can lead to issues down the line. Awareness of these pitfalls is crucial for ensuring both your safety and the proper functioning of your electrical system.
One frequent mistake is forgetting to turn off the main power supply before starting work. This oversight can result in serious injury or even fatal accidents. Always double-check that you’ve cut power at the source.
Another error involves using an incorrect replacement breaker. Each circuit has specific requirements based on amperage and voltage ratings, so it’s vital to match these exactly when selecting a new breaker.
Failing to properly secure connections can also be problematic. Loose wires may cause arcing or overheating, which could damage appliances or create fire hazards. Ensure all wires are tightly secured in their terminals.
Additionally, neglecting to label breakers clearly during installation can lead to confusion later on, especially if someone else works on the panel in your absence. Take a moment to make clear labels for future reference.
Rushing through any step increases risks significantly—whether it’s skipping safety checks or not testing the new breaker adequately after installation. Patience is key when working with electricity; take your time and do it right.
By avoiding these common mistakes, you’ll ensure a safer experience while effectively managing your home’s electrical needs.